Lady Anne's Handmade Spider Web Directions
www.packrat-pro.com

Three cornered webs Four cornered webs

Three cornered webs
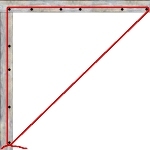
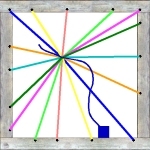
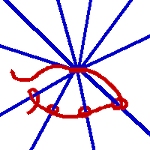
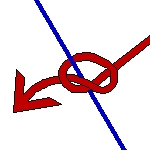
Place the nails (or thumbtacks) like the example on the left, spaced unevenly apart.Wrap one string (shown in red) around all the nails, tying off with an adjustable knot at the bottom. Make this loop as tight as possible. Making it adjustable works, too, in order to tighten it up later.
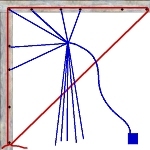
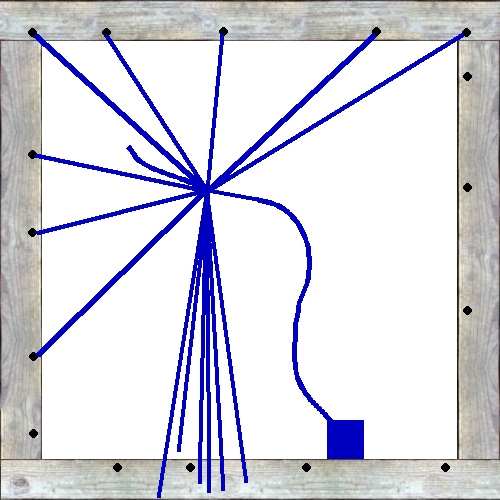
Tie long strings to the nails indicated on the left. Each string must be long enough to cross the web with plenty of room to spare.Using the ball of string, tightly tie the strings together at the center of the web, slightly off center is best. Leave a six inch tail at the center of the web for tying to a spider later. Tug and tighten the top cross strings by pulling on the loose ends of each cross string. Do not cut off the ball of string.
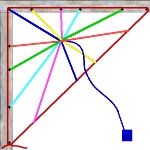
Tightly tie each cross string as shown by color, to the opposite nail or side. Tie all the strings temporarily as these might need tightening later.

Proceed to the weaving section.

Four cornered webs
Place the nails like the example on the left, spaced unevenly apart. Tie long strings to the nails indicated by blue circles. Each string must be long enough to cross the web with room to spare.
Using the ball of string, tightly tie the strings together at the center of the web, slightly off center is best. Leave a long tail at the center of the web for tying to a spider later. Tug and tighten the top cross strings by pulling on the loose ends of each cross string. Do not cut off the ball of string.
Tightly tie each cross string to an opposite nail as shown by color. Tie all the strings temporarily as these might need tightening later.

Proceed to the weaving section.

Weaving Section
With the ball of string, weave your first knot about one inch from the center, then continue around the web in a continual spiral, stopping when you run out of web cross strings. The distance between weaving is strictly up to you and your preferences.
A close up of a knot. The direction of the knot and string makes a large difference in the total outcome of the web.

After you have woven your way to the outside of the web, and tied off your last knot, tighten up any strings are needed, tie off every permimeter knot permanently, trim string ends and place just a drop of liquid superglue (not gel) on every crucial knot.

Place a spidie in the middle of the web with the 6" leg left from the original center knot.

Your finished web should look something like this

Notes:

Use typical white postal string. It's a perfect weight and colour to be subtle. Go for a glitter string if you wish to be more obvious with the web. A soft background light makes them stand out just enough to be really spooky.

Choose an out of the way location where the web won't get hit or run into.

I found that if I don't make the cross strings tight enough, the webs will sag, which can look great, too. If I secure them with a tack, make the web, finish the web, then move each tack back a little further so the entire thing is tight, it works a bit better. If the web is where it would be handled, moved or just plain fussed with, drop a tiny drop of super glue (liquid, not gel) on each intersection.


The Wicked Witch on Twenty First Street

Halloween Pictures

Halloween Haunt -  How to Page

The Ultimate Halloween Wreath

Halloween Main Page

Packrat Main Page